Below you’ll find directions and videos for hearing care procedures. (Scroll down to find a link to all the videos). However, we have found that those people who let us professionally clean their hearing aids experience fewer problems. We have the right tools and experience that allows us to identify a problem, deal with it and keep the aids functioning at their best. We will clean and check your hearing aids at no charge for the first year. After that, you can take advantage of a package we offer – to prepay at a discounted price, so you can take advantage of our expertise and enjoy a cost savings.
Daily Cleaning How-To
For all styles of Hearing Aids:
- Wash your hands and make sure they are dry before cleaning hearing aids.
- Work over a soft surface to prevent losing or breaking anything that might fall.
- Be extra mindful when cleaning, handling each piece with care.
- Turn technology upside down so debris will fall out rather than get pushed back in.
- If earwax is something that continues to be an issue, ask your audiologist about having your ears professionally cleaned.
- NEVER put your hearing aid in water or use a soaking wet cloth.
The tools that come with you hearing aids include:
- Wax brush
- A wax loop
- A cloth
- Wax guards
- Dry-aid kit — a container with drying crystals to absorb moisture and can be reactivated by heat.
The brush, either the brush that came with your hearing aids or a toothbrush (without toothpaste!) works best in the morning after the wax and other debris have had time to become dry and flaky and is more easily brushed off.
The wax loop works best at night when your hearing aids are removed because the sticky wax will cling to the loop. Since wax guards have become more common and effective for the In-the-Ear and Receiver-in-the-Ear styles, there isn’t as much need to use the wax loop. But it is still very useful for the Behind-the-Ear style aids.
Let’s Clean!
When you take your hearing aids out at night:
- Clean the case or the shell of your device with a soft cloth. If there are particularly difficult parts, you can use a damp cloth to help remove the debris.
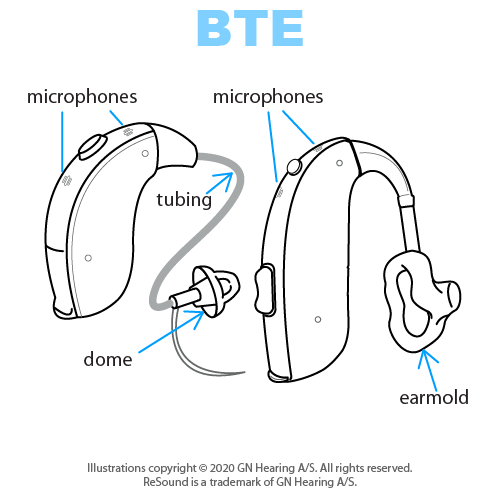
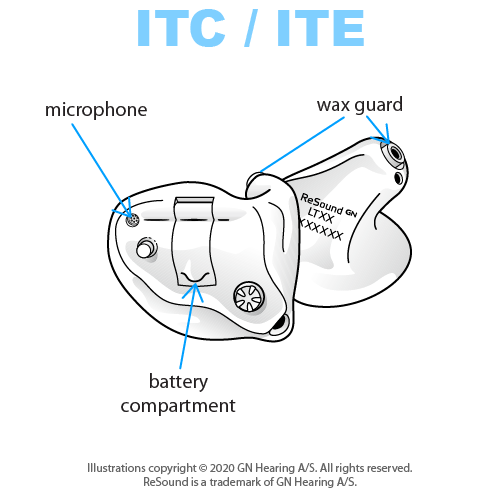
- Pay particular attention to the part of your hearing aid that goes into your ear. The most common reason hearing aids don’t work is because they have become clogged with wax, so you will want to be careful and thorough when scooping out debris. Use the wax loop to scoop out any wax that has accumulated but be careful not to damage the wax guard (for ITE and RIC styles).If you have Behind-the-Ear style hearing aids with earmold, and the earmold is so clogged with wax that you can’t reach it with the wax loop, please ask your audiologist for instructions about cleaning.
- When done, keep the battery doors open and store in the hearing aid case overnight. Even better, a dehumidifier is more effective in removing moisture from your technology, helping it last longer.
In the morning, use the brush to clean the microphone openings and remove any remaining wax and debris that you notice on the case and again on any parts that go into your ear. If the wax guard still looks clogged, replace it with a new one. Close the battery doors and you’re ready to hear the day.
Other products you may find useful include
- Electric Dehumidifier: Designed for the maintenance and storage of all types of hearing aids. The device is a maintenance chamber that dries and disinfects your devices. This process kills fungi and bacteria, and it greatly reduces itching and the chance of infections.
- Cleansing Wipes: Cleansing wipes contain a surface-active agent that is effective against earwax but doesn’t damage hearing aids, helping to facilitate the daily cleaning of your hearing aids.
- Cleaning Spray: Cleaning spray is specially designed to dissolve earwax quickly, which helps improve sound quality without damaging hearing aids. Cleaning sprays also help prevent skin irritation and eczema.
- Tubing Air Blower: To use with behind-the-ear hearing aids that deliver sound into the ear canal through a tube. A drop of moisture will block sound.
How to clean your hearing aids depends upon the style of hearing aid you have. Both in-the-ear (ITE) and reciever-in-the-canal (RIC) styles have an electronic component in the ear cancal. A behind-the-ear (BTE) style has an earmold that can be submerged in water — NOTE: just the earmold, not the entire hearing aid — and cleaned with certain solutions or soap; while that would be detrimental to an ITE device. Ask your audiologist what the best practices are for cleaning your specific hearing aid style.
Cleaning and Changing Wax Guards
How to Check and Change the Wax Filter in ReSound Hearing Aid Earmolds
How to Check and Change the Wax Filter in ReSound Hearing Aid Domes
How to Check and Change the Wax Filter in Oticon Hearing Aid Earmolds
How to Check and Change the Wax Filter in Oticon Hearing Aid Domes
How to Change the Wax Filter in Your In-The-Ear (ITE) Hearing Aids
How to Perform Daily Cleaning Upkeep on Your Hearing Aids
Changing and Charging Batteries
How to Change the Battery in ReSound Hearing Aids
How to Change the Battery in Oticon Hearing Aids
How to Change Your Hearing Aid Battery
Checking Your Hearing Aid Battery Level
How to Charge Your Rechargeable Hearing Aids
Hearing Aid Troubleshooting
Hearing Aid is Weak or Not Making Any Sound
- Make sure the hearing aid is turned on.
- If using a battery, make sure the battery is working and the battery door is completely closed.
- If rechargeable, make sure the hearing aid has been charged.
- If the hearing aid has a volume control, make sure you have the volume turned up.
- If there is a program button, make sure the hearing aids are in the correct program.
- Change the wax guards Video Help.
- Put in dry aid jar overnight.
Hearing Aid is Distorted or Intermittent
- Replace the battery Video Help.
- Change the wax guard Video Help.
- Brush the microphones off with a small brush.
- Put in dry aid jar overnight.
Hearing Aid is Whistling
- Make sure the hearing aid is properly fit into your ear.
- If you are wearing a scarf or hat, make sure that it is not interfering with the hearing aid.
- If the hearing aid has a volume control, check to make sure that the volume is not turned up too high.
- Change the wax guard Video Help.
- Call your audiologist to schedule an appointment to make sure that there is not excessive wax in your ear canal.


